After audio recording a meeting with Voxlog, you may wish to share this information. Often, this is because someone else asks you to do so. The good news is that all Voxlog Copy users have access to this feature.
From the basic configuration of Voxlog Copy, you have the ability to copy these recordings to the hard drive and then recopy them to a new destination that can be physical, such as a CD, DVD, Blu-ray Disc and even a USB stick, or to network storage, such as an FTP account or another account in a cloud.
For those who would like to be able to write directly to a CD or DVD disc, we have detailed an approach to configuring your workstation that we are pleased to share with you in this post.
Easier and still as efficient as ever, here’s how the experience of burning your audio recordings to CD, DVD or BD with Voxlog Copy works
Disk Initialization
1. Insert the CD, DVD or BD into the drive;
2. After inserting the disc into the drive, there are three (3) possibilities with Windows:
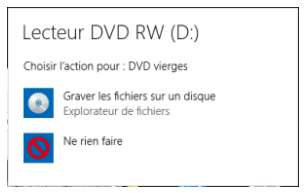
Possibility 1:
Windows displays the following window, asking you to choose the action to be performed when inserting a blank disc into the drive.

a. Click on this message.
b. Then click the Burn files to disk option in the next window.
c. Go to step 3.
Possibility 2:
Nothing happens. You don’t have a message that appears to you. Don’t panic! Just follow these few steps to continue:
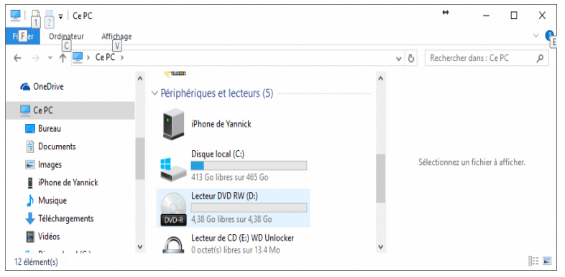
a. Open the file explorer by clicking on this icon.
b. In the file explorer, go to the section This Pc.
c. Click on the drive.
d. Go to step 3.
Possibility 3:
The next window will be displayed automatically. You have nothing else to do but go to step 3 (the next step).
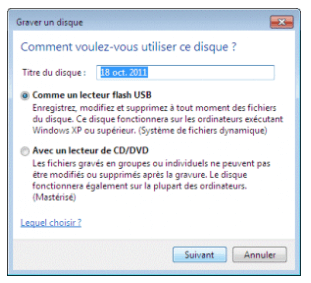
3. When the above window is displayed:
a. Enter the title of your choice in the Title section of the disc.
b. Then select Like a USB Flash Drive.
c. Click Next.
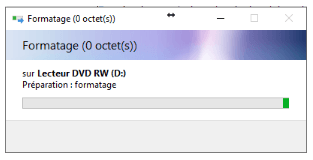
d. At this point, the drive initializes automatically.
Configuring Voxlog Copy
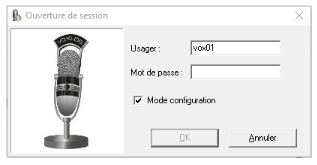
1. When Voxlog Copy opens, select the Configuration Mode check box and click OK.
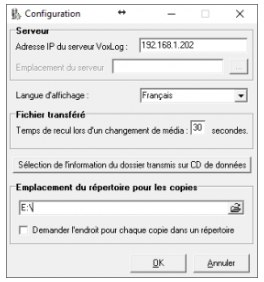
2. In the Configuration window, enter the drive letter of the disk drive in Directory Location for copies and click OK.
3. When you return to the Logon window, clear the Setup Mode check box, and proceed.
4. At the end of the replication procedure, eject the disk.
You now have a CD, DVD, or BD copy of your selection of audio recordings, ready to be played back on another computer.